Thank you, from the BaitShop Boyz! |
Brinkmann Smoke’n Pit Modifications |
Post Reply 
|
| Author | |
TasunkaWitko 
Administrator 

aka The Gipper Joined: 10 June 2003 Location: Chinook Montana Status: Offline Points: 14753 |
 Post Options Post Options
") Thanks(0) Thanks(0)
 Quote Reply Quote Reply
 Topic: Brinkmann Smoke’n Pit Modifications Topic: Brinkmann Smoke’n Pit ModificationsPosted: 21 May 2009 at 19:01 |
|
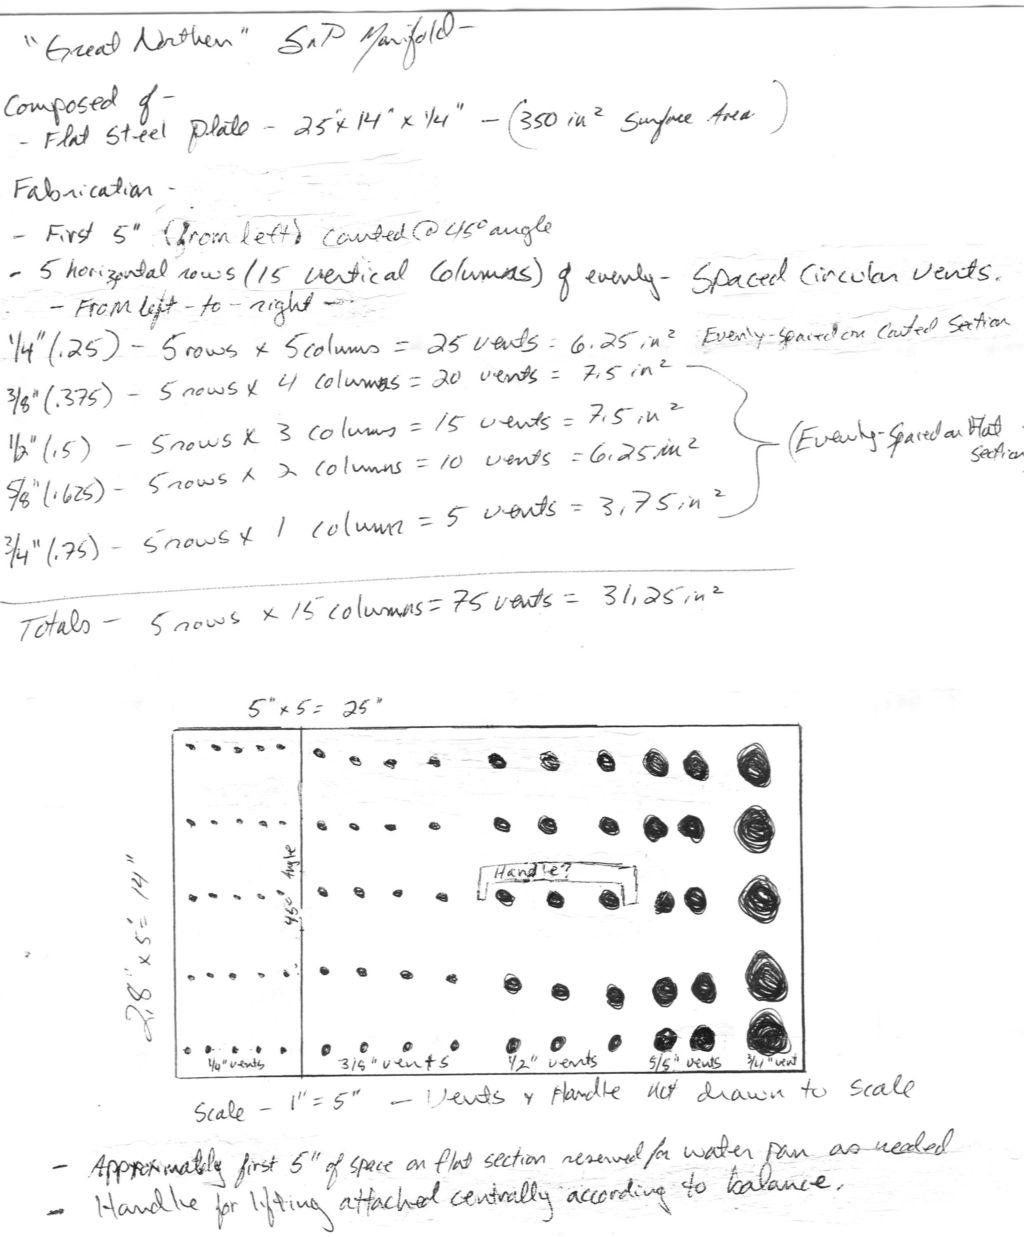
The SnP is a great smoker out of the box, but tehre are a few things that you can do to enhance the performance and tune it into a very sweet, consistent pit. here are some modifications that i have done so far to mine, and a few more that are in the works. first, i took dryer vent tape and sealed off the two large holes in each end of the lid. i am assuming these were made for installing a rotisserie, but as it is, they draw off a lof of airflow, smoke and heat. second, i went to my muffler shop and bought a length of new 2.5-inch exhaust pipe. the length was 9.5 inches, and i had a 45-degree angle cut at one end. after having him expand two inches of the end of the pipe to fit the base of my chimney (which is somewhere between 2.5 and three inches), it is now sitting very snugly in the base and extending 7.5 inches down into my smoking chamber. this forces the air, heat and smoke to draw across the bottom of the smoke chamber, rather than skirt straight up diagnally from the firebox to the chimney at the far end. nexx up is my manifold project, which will deflect much heat away from the opening right at the firebox and dissipate it across the length of the smoking chamber. a detailed explanation will follow, but the 1/4-inch-thick steel plate will help very much in keeping temperatures constant across the chamber and will also prevent a hot spot right at the junction of the firebox and smoking chamber. here's a diagram of the proposed manifold. please excuse the bad menmanship and that lack of straight lines for the vents.
this design obviously needs a lot of tweaking, but i figure that this is a good place to start. i am currently working with RIVET on compiling a "manual for modifications for this smoker model. looking forward to some finished results! |
|
|
TasunkaWitko - Chinook, Montana
 Helfen, Wehren, Heilen Die Wahrheit wird euch frei machen |
|
 |
|
|
TasunkaWitko
Administrator
aka The Gipper Joined: 10 June 2003 Location: Chinook Montana Status: Offline Points: 14753 |
Post Options
Thanks(0)
Quote Reply
Posted: 22 May 2009 at 17:13 |
|
some concepts......
Edited by TasunkaWitko |
|
|
TasunkaWitko - Chinook, Montana
Helfen, Wehren, Heilen Die Wahrheit wird euch frei machen |
|
|
|
|
rivet
Left BSB in Disgrace 
Joined: 13 May 2009 Location: United States Status: Offline Points: 1017 |
Post Options
Thanks(0)
Quote Reply
Posted: 22 May 2009 at 18:08 |
|
Ron is doing a lot of great brainwork in fine tuning modification
designs. If anyone of you all has or is gonna get a Smoke N'Pit or
Smoke N'Pro, these are the details to make that unit run like a
champ.
|
|
 FIRE IS OUR FRIEND! FIRE IS OUR FRIEND!
|
|
|
|
|
TasunkaWitko
Administrator
aka The Gipper Joined: 10 June 2003 Location: Chinook Montana Status: Offline Points: 14753 |
Post Options
Thanks(0)
Quote Reply
Posted: 20 September 2009 at 04:09 |
|
i've got some "right out of the box" advicefor the SnP, and am also attaching some information in word documents that wll hopefully be helpful for "permanent" mods.
if you have one of these units, first thing is by now, you've probably found that the axle/wheel system on the SnP is not so hot. just run down and buy some large washers and 2 large bolts that will fit through the "axle holes" and two fitting lock nuts. i don't know what the "right name is, but the bolts i got were the ones that had threading only on the end portion, leaving a portion with no threading so that the wheels could turn freely. you can also, if you choose, purchase some heavier-duty lawnmower or similar wheels.
next quick fix - this is easy! get some hi-heat tape for dryer vent or wood-burning stove work; it is usually silverish in color. use this tape to block the two big holes at either end of the smoking chamber. this helps a lot with airflow and temperature retention.
next - rather than following the instructions and building your fire on the bottom grate of the fire box, move all grates up to the "top" level so that it makes a crosshatch and build your fire here. there is much, much more air below your fire to keep it from choking out now. note that this is a "quick and dirty" mod that can later be replaced by a better mod, which is a well-designed charcoal basket.
next, take your "drip tray" and set it so that it is all the way up at the "west" end closest to the fire box, and down as far as it will go at the opposite end. the reason for this is to block flames and deflect the harshest heat from your firebox into your smoking chamber. it is a 'quick and dirty" substitute for a proper manifold/tuning plate, but works very well until you get or fabricate one.
to extend this idea a little and make it even more effective, set a small bread loaf pan (the disposible heavy-foil type) right up to and almost against the hole from the firebox on the drip tray, leaving just a small area for smoke and heat to pass through. you might have to lower the drip tray a level to do this, but it will be fine as long as the tray is still at a downward angle. this helps control the hot spots even more and does add a small amount of moisture to the cooking process, similar to the water pan on an ECB. finally, it helps regulate the temperature coming into the smoking chamber so that it can even out across the chamber.
next, get at least four regular masonry bricks or six 2x2x8 bricks (or a similar square-inchage of fire bricks, if you can find them at a local spa/stove store). place these 2x2 (3x3 if using the 2x2x8 bricks) starting at the "east" end of the smoking chamber (farthest away from the firebox, under the chimney end). this is a good start, but you can of course put as many bricks as you want and even go all the way across the smoking chamber if you want. this will go very far to retain heat and prevent temperature drops. it will make it so that your unit takes longer to come up to temperature, but once it does, you are in great shape.
the last of the "quick and dirty" mods" is also so easy that it is silly: get two or three HEAVY old blankets and fold them so that they sit on top of the smoking chamber only, extending to the chimney and "folding" around it. it is OK if there is some draping down over the "east" end and the front and back of the unit, but make sure nothing is hanging down at the west or firebox end. these layers of insulation help more than you can imagine no matter what climate you live in and will drastically cut down on your charcoal or wood consumption - moreover, temps should even out very closely across the chamber. it looks as redneck as it sounds, but it WORKS, and that's what matters. before long, you will get pretty good at folding the blankets so that they fit just right and will aslo be able to lift them off and put them back on easily as you add, remove or check the meat, spritz or mop etc.
the above mods work, and work well, and don't cost anything at all. having said that, they can be improved upon with some investment in materials and welding. i consider most of the Q&D mods to be simply "poor man's substitutes" for what actually needs to be done. i use them all, but i am saving up for the "permanent" versions.
i am attaching two word documents detailing the mods that RIVET and i came up with, and they work very well. the first one, titled "SnP mods," has more detail - read that one first. the "SnP welding mods" can be printed out and taken to your welder, as it condenses the information to specs and data that he will need. both documents have detailed pictures. i am also attaching the BBQFAQ in word format. this literally has more information that you will need, but it is quite possibly the best and most comprehensive document on all aspects of barbecue, including equipment, the food invovled and the methods for using everything. the first 12 pages are a little dated and irrelevant, but from there it gets very valuable very fast.
any questions, just ask.
Edited by TasunkaWitko |
|
|
TasunkaWitko - Chinook, Montana
Helfen, Wehren, Heilen Die Wahrheit wird euch frei machen |
|
|
|
|
rivet
Left BSB in Disgrace
Joined: 13 May 2009 Location: United States Status: Offline Points: 1017 |
Post Options
Thanks(0)
Quote Reply
Posted: 10 November 2009 at 00:51 |
|
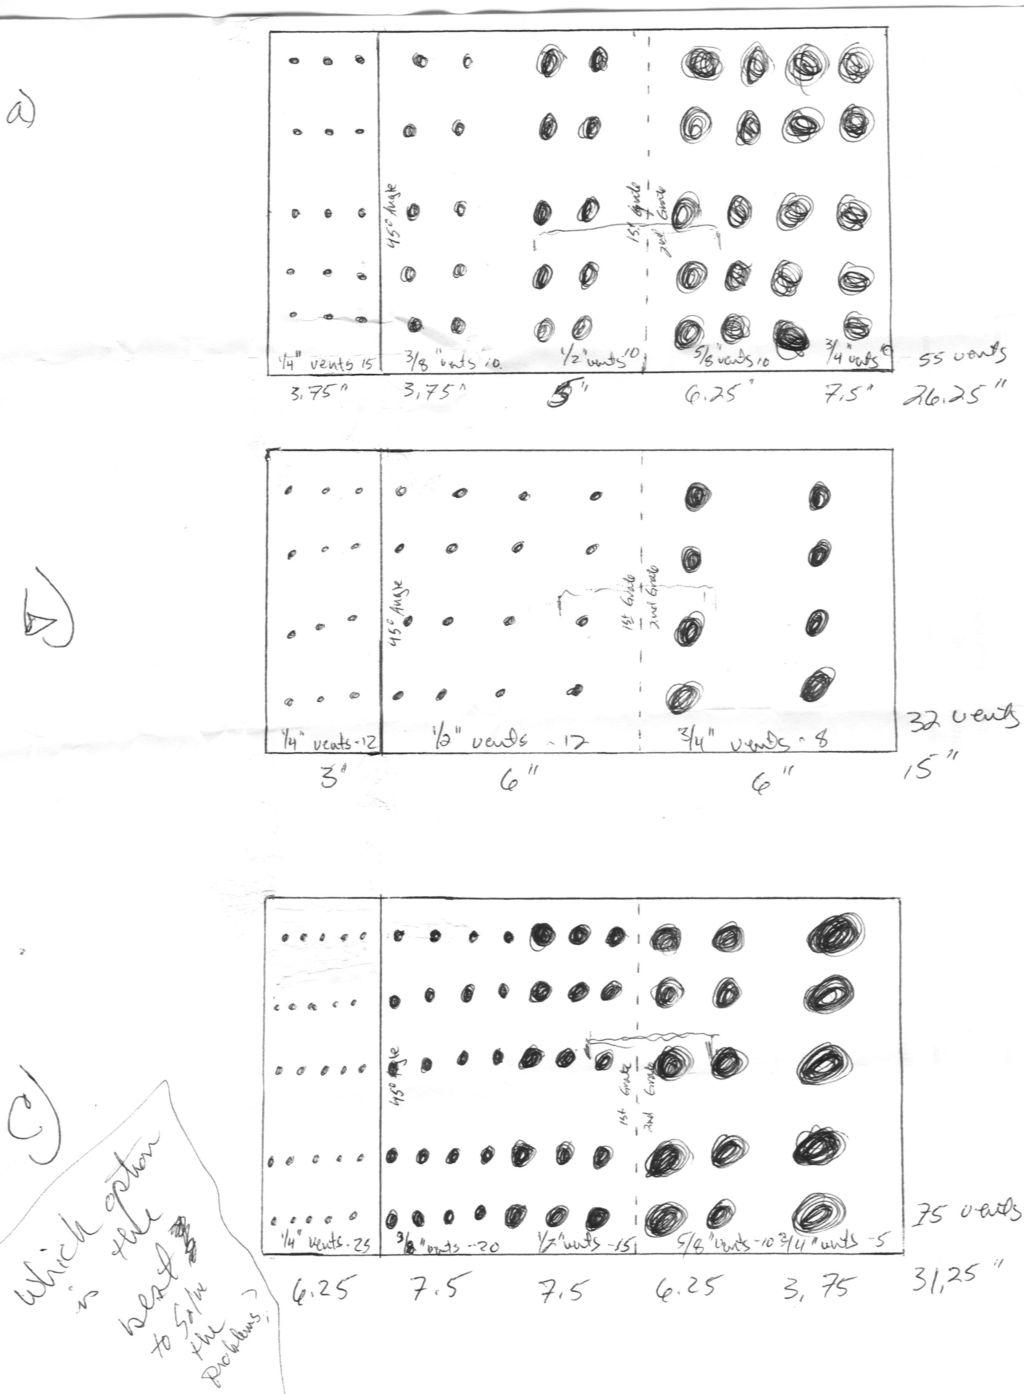
Ron, the more I think about it, I believe what you need is a combination of the top and the bottom drawings.
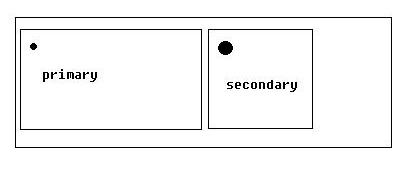
Check out my theories and let me know your opinion. Really push back if you think otherwise! 1) I think you are correct in wanting the handle moved EAST to accomodate the water pan. That is a nice feature. 2) What is the extra length of the Manifold versus mine you wanted? If I recall, your design was to extend fully half-way across the smoking chamber, correct? Mine is a bit shorter. 3) I think with your super-duper cold weather up there, on the canted portion, you'll need bigger, or more, (either way) holes to allow for more heat entering the smoking chamber and less "blocking" of the heat. Mine has 3 columns of 5 rows of 1/4 inch holes - as you look from south to north as you cook. I'm guessing same number of holes, but 1/2 inch? What are your thoughts? As an aside, the canted portion is the "engine" of the manifold which does most of the work. The flat postion is the "transmission" wich channels the work to the food. Thus, we need to "tune" your engine to your particular needs, which are, deeply cold weather. We need to allow for lots more heat into your chamber than I need here, just to maintain operating temps. Does this sound right? 4) Given the above, you also need a lot of plate steel "transmission" to maintain and radiate heat across the cooking expanse. Because of that, I think you may want to limit the amount of smoke-apertures to less than some of your drawings suggest. What do you think of a combination of sorts~ the "center" third portion of the manifold itself (canted to the left, east end to the right) looking like your top drawing with 4 columns, 2 rows and the East (or right hand side) third having 3 colums of 5 rows like the bottom-most drawing? These are just my thoughts, and the ultimate decision and design is yours. Be aware that blowing holes as Andy does is not nearly as exact as drilling them out and the sizes are approximations. 5) You need and want another small "extension" plate/manifold for the far East end of the smoking chamber that is separate and removable from the main manifold. Any ideas on the dimensions? Check out the next PM I send you with more thoughts on this. It'll have pics. Edited by TasunkaWitko |
|
|
FIRE IS OUR FRIEND!
|
|
|
|
|
TasunkaWitko
Administrator
aka The Gipper Joined: 10 June 2003 Location: Chinook Montana Status: Offline Points: 14753 |
Post Options
Thanks(0)
Quote Reply
Posted: 10 November 2009 at 07:07 |
|
hey, john - got your PMs on this and we'll see what we can come up with. to answer questions above: 1. i agree - i am leaning more and more toward NOT having a waterpan, but i like the idea of having space available for one for things such as brisket. i imagie there are other times when one is desireable and makny times when one certainly wouldn't hurt. 2. i believe it needed another six inches to reach the middle of the smoking chamber; making the length of the base steel plate 25 inches long (before the 45-degree angle). 3. i'm thinking half inch might be a little big for two reasons: first, i am worried (correct me if i am wrong) that holes that big may allow too much direct heat in the form of flames or something very close to them) to get to the meat, whcih could lead to scorching. second, the majority of the barbecue i would do is in the summer, when temps are hotter than giada de laurentiis. the larger vents would then take away the advantage of the canted portion. because of this, i believe that your design there is sovereign: quarter-inch vents as well as the open spaces left by the angled edges on the sides. my thinking is that once the manifold gets heated up, it's going to be just hot and from there the issue is actually too much heat as well as efficient smoke dispersal (and in that case the quarter-inch vents are definitely better at that spot). i agree with what you're saying about the engine versus the transmission but not sure that larger vents are the way to go - perhaps placing the canted portion a little farther back from the opening to the firebox? 4. i thnk you are spot on and the number and placement of the vents is still an issue that must be worked out in a satisfactory way. the middle drawing was an attempt to compromise the top and bottom, but i may have been a little too conservative. 5. the dimensions i have been considering are starting at the eastern edge of the primary manifold (right up against it or possibily with just a fraction of an inch of open space to allow heat/smoke) and then extending at least up to the point where the chimney extension kisses the grate. the reason for this is that i have noted plenty of smoke (and heat) at the eastern end of the chamber. i once tried to make a little jerky by placing it under the chimney extension, thinking it would dry well because of the air movement. in fact, it ended up cooking the meat rather than drying it. this is not set in stone, however, and it might be deemed prudent to extend the secondary manifold to the edge of the smoking chamber, leaving the primary (fair-weather) manifold for summer and then adding the secondary (booster) manifold in the winter. those are my thought so far. correct me if i am wrong on any of this as all of these ideas come from my head, not from practical experience with the manifold. Edited by TasunkaWitko |
|
|
TasunkaWitko - Chinook, Montana
Helfen, Wehren, Heilen Die Wahrheit wird euch frei machen |
|
|
|
|
rivet
Left BSB in Disgrace
Joined: 13 May 2009 Location: United States Status: Offline Points: 1017 |
Post Options
Thanks(0)
Quote Reply
Posted: 10 November 2009 at 08:15 |
|
I agree with all your points. You definitely know your weather, smoker and applications.
The ultimate design has to be yours and what you are happy with. Definitely agree with the canted portion openings now that you spoke of them. As far as the water pan, you have to decide. Are you EVER gonna want to use one or not? If you ever think you will, then you should have your design reflect that option- meaning the handle placement. There's nothing worse than having something custom made and then damning yourself for missing some minor tweaking. Just think about it. Think about the size and placement of the the smoke vents you want on your manifold, both the summer one and the winter extension part. Let me know. I didn't know there was that much heat coming to the chimney part, but that makes sense. All the heat is concentrated into a cone going up the pipe! Do you think you need to baffle the smoke at that point? I mean, are you putting that much meat near the chimney? I'd think that a couple columns of 3/8 inch holes would be good. Remember, you don't want to choke off the smoke flow from you unit just to save BTU's. Better to burn a bit more fuel (and maintain a clean draw) than to choke off your meat in the smoking chamber. |
|
|
FIRE IS OUR FRIEND!
|
|
|
|
|
TasunkaWitko
Administrator
aka The Gipper Joined: 10 June 2003 Location: Chinook Montana Status: Offline Points: 14753 |
Post Options
Thanks(0)
Quote Reply
Posted: 12 November 2009 at 06:46 |
|
hey, john - to continue our conversation, here's a very rought draft of what i ahd in mind:
i get now that you're atlking about starting the secondary from the OTHER end of the smoking chamber - that's what had me confused! |
|
|
TasunkaWitko - Chinook, Montana
Helfen, Wehren, Heilen Die Wahrheit wird euch frei machen |
|
|
|
|
rivet
Left BSB in Disgrace
Joined: 13 May 2009 Location: United States Status: Offline Points: 1017 |
Post Options
Thanks(0)
Quote Reply
Posted: 12 November 2009 at 08:02 |
|
Okay...So I'm getting that you want the secondary one to be "big" in
the sense of taking up "most" of the space not covered by the main
manifold?
Now I am getting much clearer picture! Is your drawing roughly to scale, meaning that you want a decent bit of clearance between the secondary manifold and the east end of the smoking chamber, along with room for slightly less clearance between the secondary and the primary manifold edges? OR actually, you want the secondary manifold to be close within the primary manifold, AND EXTEND TO THE EAST as far as the edge of the chimney extension? If so, how many inches do you envision between the primary and secondary manifolds? Edited by rivet |
|
|
FIRE IS OUR FRIEND!
|
|
|
|
|
TasunkaWitko
Administrator
aka The Gipper Joined: 10 June 2003 Location: Chinook Montana Status: Offline Points: 14753 |
Post Options
Thanks(0)
Quote Reply
Posted: 12 November 2009 at 10:30 |
|
that's what i'm not sure. i know that the primary needs to end exactly halfway into the smoking chamber. i had at first envisoned it ending at the end of the middle grate, but then i rememebred your discussion on entropy, which if i remember correctly means that the heat will still be radiating at least as far as the end of the middle grate, if not farther than that, even. taking entropy into account, i think that to the center of the smoking chamber is plenty. to answer your first question, my original vision for the secondary was tohave it begin very enar the primary, possibly even right up against it but certainly no more than an an inch away from the primary. as for how far it extended, it was never too sure on that. i think that the best place to end it would probably be at the point where the western edge of the chimney extension kisses the grate. this would allow airflow to be completely unimpeded. as i said, that was my original idea, but now after seeing what you were talking about (placing the secondary at the eastern edge) i am wondering if it might not work better to do just that and carry it as far as the eastern endge of the chimney extension. one thing this would do is allow for some flexibility in adjusting for the circumstances. what i mean is that i can start it at the eastern edge of the smoking chamber OR if the conditions warrant, i could also abut it up against the primary to extend it a bit. such versatility is rather attractive, but there could be angles i am not thinking about. what do you think? i'm in new territory here, and my original idea might not be the best way to go, so i am very open to suggestion, especially since i know you've studied some of this in college, whereas i took all those darn history, music and geology courses! |
|
|
TasunkaWitko - Chinook, Montana
Helfen, Wehren, Heilen Die Wahrheit wird euch frei machen |
|
|
|
|
rivet
Left BSB in Disgrace
Joined: 13 May 2009 Location: United States Status: Offline Points: 1017 |
Post Options
Thanks(0)
Quote Reply
Posted: 12 November 2009 at 18:29 |
|
I'm thinking your idea is better. Leave the "gap" at the EAST end of the smoker and butt the secondary manifold up against the primary one for really cold weather. In milder (for you all) weather you can pull the secondary manifold away from the primary one an inch or so, and still have a nice gap underneath the chimney, the eastern half anyway.
|
|
|
FIRE IS OUR FRIEND!
|
|
|
|
|
TasunkaWitko
Administrator
aka The Gipper Joined: 10 June 2003 Location: Chinook Montana Status: Offline Points: 14753 |
Post Options
Thanks(0)
Quote Reply
Posted: 12 November 2009 at 20:44 |
|
sounds like a plan, the - all that's left is the vent pattern, i'd say!
 Edited by TasunkaWitko |
|
|
TasunkaWitko - Chinook, Montana
Helfen, Wehren, Heilen Die Wahrheit wird euch frei machen |
|
|
|
|
rivet
Left BSB in Disgrace
Joined: 13 May 2009 Location: United States Status: Offline Points: 1017 |
Post Options
Thanks(0)
Quote Reply
Posted: 13 November 2009 at 05:46 |
|
Okay Ron, if you got any thoughts or ideas, let them rip! I'm gonna be
doing the measurements tomorrow before the pastrami goes in and do the
drawings during the smoke, probably. I think we've nailed down
everything except any last items you may have thought of.
This is exciting and gonna be cool to see in action! |
|
|
FIRE IS OUR FRIEND!
|
|
|
|
|
TasunkaWitko
Administrator
aka The Gipper Joined: 10 June 2003 Location: Chinook Montana Status: Offline Points: 14753 |
Post Options
Thanks(0)
Quote Reply
Posted: 13 November 2009 at 06:44 |
|
here's the (not to scale) drawing showing things in a little more detail:
as for the vent pattern, i say on the primary it should be the same as your proven design, with an extra row of the large vents - the spacing on everything might need a little tweaking due to the extra length, but no use re-designing a good wheel. for the secondary - i'll withhold judgement until the final measurements, but i'm thinking a simple extension of the same vent size would work well; anything larger might (i stress the word might) compromise the heat-retaining qualities of the secondary. |
|
|
TasunkaWitko - Chinook, Montana
Helfen, Wehren, Heilen Die Wahrheit wird euch frei machen |
|
|
|
|
TasunkaWitko
Administrator
aka The Gipper Joined: 10 June 2003 Location: Chinook Montana Status: Offline Points: 14753 |
Post Options
Thanks(0)
Quote Reply
Posted: 19 January 2010 at 11:46 |
|
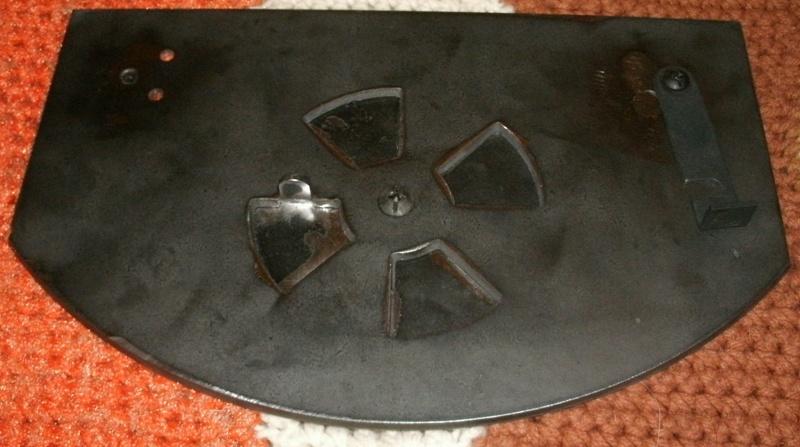
over the last few weeks, i have taken the final step in maximising the potential of the outstanding properties of this pit: the manifold.
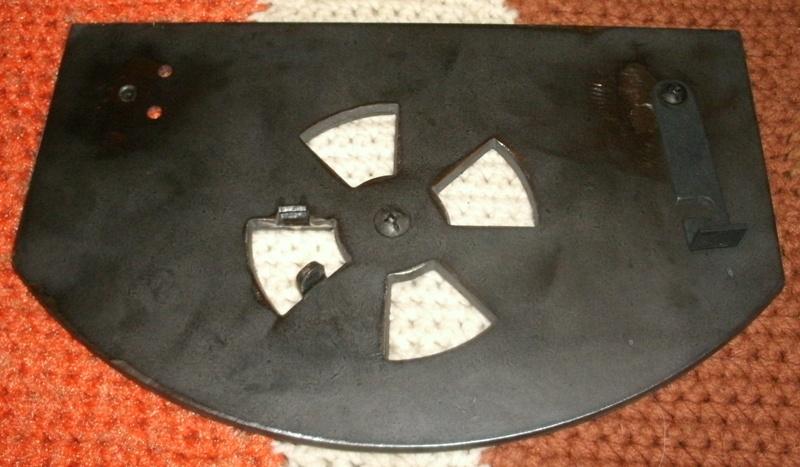
otherwise known as a baffle, tuning plate etc., the purpose of the manifold is to both deflect direct heat from the food and act as a heat retention device in order to maintain steady temperatures across a pit. we can argue semantics and the science of heat transfer of all day, but that's a good layman's description. the thick, heavy manifold takes a while to heat up to temperature, but once it does, it is like you are on autopilot and you can maintain temsperatures for a very long time with only a very small addition of fuel. the improvement in fuel efficiency is nothing short of miraculous, which is important any time, but even moreso in winter - and that factor is multiplied exponentially where i live. this manifold is modeled on RIVET's design, with a few differences that reflect both my preferences and also the necessities imposed by geography. The manifold is constructed of quarter-inch steel plate. rivet has a spec sheet drawing with specific dimensions etc., but basically it is wide enough to sit in the smoking chamber under the grates, and long enough to reach to the midpoint of the smoking chamber. the "western" end of the manifold is canted at a 45-degree angle and butts up against the opening between the firebox and the smoking chamber perfectly. there are a series of vents blown through that start small on the canted portion and gradually get larger toward the eastern end. there is a handle for conveniently lifting the manifold in order to set it on or take it off the pit, and also for moving it east or west, if desired for temperature and smoke control. the space between the canted portion and the edge of the handle will accomodate a loaf pan, should a water pan be desired. there is also a secondary manifold that is the same width as the primary, but just long enough to reach the western edge of the chimney. this secondary manifold is specifically designed for this north montana latitude and climate, where temperatures during the winter are so low that they don't get talked about on the news. because of our special tempeerature conditions, i wanted another level of heat retention, and the secondary manifold provides just that. the "great northern" moniker is a reflection of the history in north-central montana and is a nod to james j. hill's great northern railroad, which blazed the trail into this area. in the winter, temperatures can be very, very far below zero; last week, i woke up to 38 below zero, no windchill. in a climate like that, you need all the thermal mass you can get! here's a series of pictures showing the design features of the manifold.
due to the fabrication process of the manifold, it is necessary to do a "pre-burn" in order to burn off any residues or oils. we prepared for this by filling the trusty charcoal basket (another outstanding rivet-designed mod) with cottonwood and some chunks of scrap 2x4. note: the 2x4 sections (and pine, for that matter) would NOT have been used if we were going to cook, of course, but for quick, hot heat, it works very well.
i would have used charcoal to get things going, but there were no opened baggs of it around, so this was an all-wood burn. we set the primary manifold in place; butting it up right against the western wall of the smoking chamber:
here's a good view of how the canted portion works to deflect direct heat away while allowing smoke and ambient heat to waft into the chamber:
we then set the secondary manifold in place, off to the east of the primary, below the chimney:
here's what we had when both manifolds were in place:
as you can see, the secondary can be moved around if necessary in order to regulate airflow, smoke infiltration etc.:
we wadded up some newspaper and tossed it under the charcoal basket, then lit it up. before long, we had a good, crackling fire, but because much of the wood was wet on the outside, there was a lot of smoke. all the better to see the vent pattersn perform exactly as advertised! soon, we were getting some good warmth on a chilly day. temperatures took a little while to rise while the firebox lid was open (we were letting the wood catch well before closing the lid). half an hour or so later when the wood was burning well, we closed the lid, and the temperatures rose quickly and dramatically. the outside of the smoker got good and hot, too hot to touch, and i took a look in at the oven thermometer i had set in the smoking chamber at the far end (so i would know the temperatures farthest from the fire). the temps were already past 300 degrees. the manifold was doing it's job perfectly, keeping direct heat away while also evening out temperatures. it wasn't that much later that we were at 400, then 450.
i had a ridiculously easy time holding the temps at 450 for a half hour, which i figured would give enough time to burn off any residues. the manifold of course blackened as it seasoned, but it's all good, that's what it's supposed to do.
i had to leave for a while to head out to my parents' place and help my dad with something. i got back maybe an hour later and temperatures were still above 350. not bad, consideirng i was using fast-burning cottonwood by now, and it was a cold day. i put a few small logs of cottonwood on and brought the temperatures up quickly up above 450 again, and then since then have let it burn down.
all-in-all, a very successful pre-burn. i am very much looking forward to using this at regualr cooking temperatures for cooking barbecue. i was going to toss a chicken on today to cook and then de-bone/chop for a soup tomorrow, but in the end decided not to until i can clean out all ash etc. from the treated 2x4s i was burning. i will be sure to report on my first smoke with this outstanding modification package! a million thanks to RIVET for all of his assitance with the great northern manifold project. without him, it wouldn't have been accomplsihed and i am grateful! |
|
|
TasunkaWitko - Chinook, Montana
Helfen, Wehren, Heilen Die Wahrheit wird euch frei machen |
|
|
|
|
TasunkaWitko
Administrator
aka The Gipper Joined: 10 June 2003 Location: Chinook Montana Status: Offline Points: 14753 |
Post Options
Thanks(0)
Quote Reply
Posted: 19 January 2010 at 11:54 |
|
here's one more important modification for this smoker: a "bulletproof" firebox door.
the reason for this mod is because the original (on the right) is made of very thin metal. after a season or so of real barbecue, the thin metal will warp and the door's ability to regulate airflow is compromised. the solution? build an exact copy, except in 1/8" steel plate.
as you can see, this metal isn't going to warp any time soon, if ever. the difference between the two is clear. there is an extra advantage in that retained heat is kept in the firebox rather than being lost through the thin skin of the firebox door. we're currently looking into the possibility of a "sheath" that will insert into the bottom of the firebox to perform a similar heat-retention duty, and also to protect the bottom of the firebox from deterioration due to heat and moisture.
the new firebox door is an exact copy, using the old one for a template. the butterfly "shutter" regulates the airflow and can be adjusted accordingly. here's a view of the back side:
the shutter turns easily from open to closed:
this mod was a bit on the expensive side, 65$, but i have a feeling that it will pay for itself before long in reduced fuel consumption. besides, with a thin, warped door, that you're going to have to eventually replace anyway, you might as well pay your welder for some quality. i would much rather spend 65$ now than replace with a cheap, thin one three or four times and end up spending more money and still coming out with something that doesn't do nearly as good a job. Edited by TasunkaWitko |
|
|
TasunkaWitko - Chinook, Montana
Helfen, Wehren, Heilen Die Wahrheit wird euch frei machen |
|
|
|
|
rivet
Left BSB in Disgrace
Joined: 13 May 2009 Location: United States Status: Offline Points: 1017 |
Post Options
Thanks(0)
Quote Reply
Posted: 19 January 2010 at 12:20 |
|
Beautiful looking door, and from the pictures extremely high quality
workmanship. You got every bit of your money's worth on this one, Ron!
That metalsmith knows his stuff. The detail on the cuts for the
butterfly, the cleanliness of the contour edging...they all
demononstrate superb quality work. I would be happy to have that skill
for $65...and that's plain fact. Congratulations!
 |
|
|
FIRE IS OUR FRIEND!
|
|
|
|
|
Post Reply
|
|
 Tweet
Tweet
|
| Forum Jump | Forum Permissions You cannot post new topics in this forum You cannot reply to topics in this forum You cannot delete your posts in this forum You cannot edit your posts in this forum You cannot create polls in this forum You cannot vote in polls in this forum |


 Topic Options